Sunday, August 21, 2011

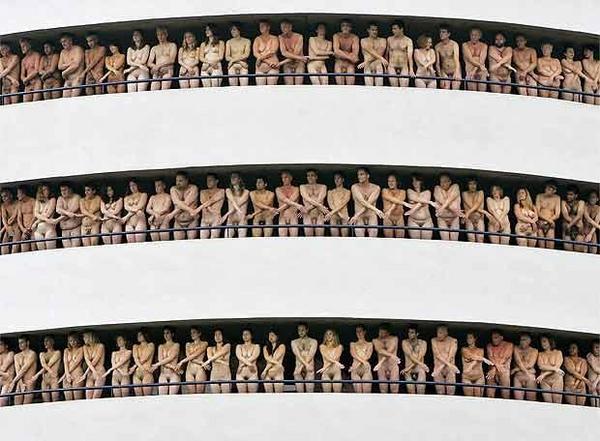
Spencer Tunick


Why does he shoot what he does?
What sets his work apart from other photographic artists?

His work has the ability to be talked about from multiple perspectives.
It upsets people, which in turn opens up discussion.

It is involved with an 'experience' for the participants, a lot talk about the feeling of 'freedom'

Freedom
Illegal
Urban
Human Form
Levelling of status
Dedication
Hook, gets people to look
Different cultural meanings and readings
sculptural

Other artists with similar themes or work:
Antony Gormley


Sunday, August 14, 2011

assignment 1 - Part 10

Cutting Out

1. Open all three images
2. Create a new document (File>New)
3. Make document 3000 x 2000 pixels (change from cm to pixels)
4. Using a suitable technique cut out the 3 elements from the images and drag onto new document (lasso, polygon lasso, layer mask etc)
5. Resize images on page (edit>free transform)

assignment 1 - Part 9

Hand Colouring

1. Create layers and change to overlay type
2. Using colour and brush settings paint in colours to suit
3. change opacity and brush settings to get feel right
4. Not looking for photo real colour, but more like hand coloured TV or film
5. Look up hand coloured TV and film images to get the right feel

assignment 1 - Part 8

Save for web

1. open image in photoshop
2. Change to B&W (image>adjustments>B&W
3. Tweak colours to make a more contrasty image (yellows and greens)
4. Resize image to 600 pixels wide
5. Sharpen image (filters>sharpen>smart sharpen) keep below 100, radius under 1
6. Save for web (file>save for web & devices) select JPEG, tweak quality to keep file under 90kb

assignment 1 - Part 7

A4 on A3 page

1. tweak photo and use white balance picker on clouds to get a blue sky
2. resize image to A4 dimensions (Image>image size)
3. Resize canvas to A3 (Image>canvas size)

Assignment 1 - Part 6

Colour change

1. Tweak photo to look good
2. Select car body using magic wand tool, adjust tolerance setting to suit
3. Click on Quick Mask (under colour on toolbar)
4. using black & white paint in or out to refine selection
5. Click on Quick Mask to bring back selection
6. Click on Adjustment layer (on layer panel) select hue/saturation
7. Play with hue slider to change colour, your choice of colour

Assignment 1 - Part 5

Cloned horse

1. Tweak settings in Camera Raw to have a nice feel for the image
2. Clone out wire, use different sample spots so not to get repeat patterns.

Monday, August 8, 2011

Gregory Crewdson


Assignment 1 - Part 4

Green Car Couple

1. Clone out all people, poles and signs
2. Make multiple different source selections to eliminate repetition
3. use soft brushes to blend
4. look for different sources to clone from

Sunday, August 7, 2011

Assignment 1 - Part 3

Girl in Studio

1. Add levels adjustment layer
2. adjust white levels to remove tone from top half
3. Add levels adjustment layer
4. adjust white levels to remove tone from bottom half
5. Use layer mask to paint back any detail lost from levels
6. Select background and rub out left over bits
7. crop to larger square
8. B&W filter under image>adjustments
9. remove spots with patch tool

Assignment 1 - Part 2

Spiderguys

1. create a new adjustment layer from the layer panel, select Hue/Saturation
2. drag saturation slider to desaturate image, invert the layer mask (command+i)
3. paint out the faces on the layer mask
4. add a new layer (new layer button)
5. change layer type to Overlay
6. paint over faces with new colour
7. drag layer mask holding alt/option onto new layer

Assignment 1 - Part 1

Falling Guy

1. Trace around guy with lasso tool
2. Use the move tool to drag onto other image
3. Add layer Mask (button on layer window)
4. Using B&W paint around guy to remove background (make sure you have selected the layer mask)
5. Transform the size and rotation to suit
6. drag layer to new layer button to copy entire layer
7. turn shadow layer black under Image>adjustments>levels, drag the black slider to the right
8. Blur layer, Filter>blur>Gussian Blur
9. Adjust size of shadow
10. Change opacity of shadow in layer window.


Monday, July 25, 2011

Linking to blog

When you have made your blog, head to www.digitalphotosp5.blogspot.com and click on "Join this site" sign in with google.

Sunday, July 24, 2011

Welcome to Digital Photography SP5

This is where all the info will be placed for the 10x in class practicals.